


Granny Beaded Bag DIY: Create Your Own Vintage-Inspired Accessory

How to Do a Granny Beaded Bag: Your Complete Vintage-Style Guide
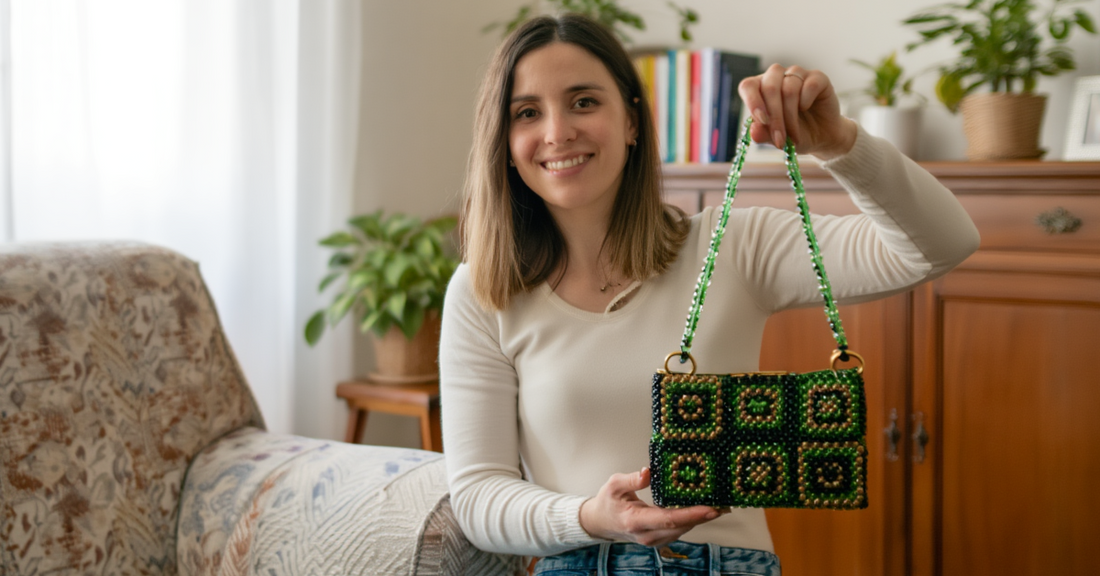
Learning how to do a granny beaded bag opens the door to creating one of the most charming and nostalgic accessories in modern craft—a stunning bag inspired by traditional crochet granny squares but crafted entirely from beads. A granny beaded bag combines the beloved aesthetic of vintage granny square patterns with the sparkle and durability of beadwork, resulting in accessories that capture retro charm while offering contemporary functionality. These distinctive beaded bags feature the classic clustered motif patterns that made granny squares iconic, translated into shimmering beaded panels that turn heads wherever you carry them.https://stellar-pearl.com/collections/beaded-bag
The appeal of granny beaded bags extends far beyond nostalgia—these accessories represent the perfect fusion of traditional craft techniques with modern beading artistry. The granny square beaded construction method uses right-angle weave or modified square stitch techniques to create individual motifs that connect into larger panels, exactly like traditional crochet granny squares join to form afghans. This modular approach makes granny beaded bags surprisingly accessible for beginners, as you create small manageable squares first, then assemble them into your finished bag rather than attempting to bead an entire bag body in one overwhelming project.
What makes granny beaded bags particularly special is their versatility and customization potential. You can create tiny evening clutches using just 4-6 granny square motifs, medium-sized shoulder bags from 12-20 squares, or spacious totes incorporating 30+ motifs. The color combinations are endless—classic white and pastel combinations for vintage vibes, bold rainbow patterns for contemporary style, or elegant monochromatic designs in metallic beads for sophisticated evening accessories. Each granny beaded bag becomes a unique expression of your creativity and color sense.
Understanding how to do a granny beaded bag empowers you to create accessories that express your unique style while mastering versatile beading techniques applicable to countless future projects. This comprehensive guide reveals everything you need to know about creating your own granny beaded bag, from materials and basic motif construction to assembly and finishing techniques that ensure professional results! 💎✨

Essential Materials for Your Granny Beaded Bag
Before learning how to do a granny beaded bag, gathering appropriate materials ensures smooth construction and beautiful results. The modular nature of granny square beaded construction requires specific supplies that accommodate the repetitive motif-making process.
Bead Selection for Granny Square Motifs
- Size 8/0 Seed Beads: The most popular choice for granny beaded bags, these medium-sized beads (approximately 3mm) create clear pattern definition while working up relatively quickly
- Size 6/0 Round Beads: Larger alternative beads work beautifully for granny beaded bags when you want bolder, more dramatic motifs with faster construction
- Color Planning: Select 3-5 contrasting colors for your granny beaded bag—typically one background color (like white, cream, or black) plus 2-4 accent colors for the classic granny square cluster effect
- Quantity Estimation: Plan for 200-300 beads per individual granny square motif, multiplied by the number of squares your beaded bag design requires
- Finish Considerations: Choose between matte, metallic, or AB (aurora borealis) finish beads to create different effects in your granny beaded bag
Thread and Stringing Materials
- Nymo Thread: Traditional beading thread in size D works excellently for granny beaded bags, offering strength and slight stretch that accommodates the weaving techniques
- FireLine: Braided fishing line (6-8 lb test) provides superior strength for granny beaded bags intended for regular use, though it's slightly stiffer than Nymo
- Thread Color Matching: Select thread colors matching your background beads so any visible thread blends into your granny beaded bag design
- Waxed Thread Advantage: Pre-waxed thread or applying beeswax reduces tangling during the repetitive weaving process of creating granny square motifs
- Length Management: Cut working thread lengths of 4-5 feet—long enough to complete full motifs without constant thread additions for your granny beaded bag
Tools and Supplies
- Beading Needles: Size 10-12 needles with eyes accommodating your chosen thread work perfectly for granny beaded bag construction
- Scissors: Sharp embroidery scissors for cleanly trimming thread on your granny square motifs
- Bead Mat: Textured surface prevents beads from rolling while you work on your granny beaded bag motifs
- Small Containers: Organize different bead colors separately to avoid mixing during granny beaded bag construction
- Measuring Tools: Ruler or tape measure ensures consistent motif sizing throughout your beaded bag
- Thread Conditioner: Beeswax or commercial thread conditioner reduces friction and tangling when creating granny square motifs
Finishing and Assembly Hardware
- Jump Rings: Small metal rings (4-6mm) for connecting individual granny square motifs into panels for your beaded bag
- Lining Fabric: 1/4 yard of coordinating fabric provides interior structure for your granny beaded bag
- Magnetic Clasp: 18-20mm closures secure your granny beaded bag contents
- Chain or Strap: Pre-made handles in lengths appropriate for your granny beaded bag style (clutch, shoulder bag, or crossbody)
- Fabric Glue: Clear-drying adhesive for attaching lining to your assembled granny beaded bag
Budget and Quantity Planning
- Single Motif Costs: Each granny square requires approximately $2-$4 in beads and supplies when purchasing materials in reasonable quantities
- Complete Bag Investment: A small granny beaded bag using 6-8 motifs typically costs $20-$35 in materials including hardware and lining
- Bulk Purchasing Benefits: Buying beads in larger quantities (50g or 100g tubes) significantly reduces per-motif costs for your granny beaded bag project
- Tool Investment: Quality needles, scissors, and thread represent one-time purchases serving hundreds of future granny square projects
- Color Experimentation: Starting with budget-friendly opaque beads allows testing color combinations before investing in premium beads for your granny beaded bag
Proper material selection and organization creates the foundation for enjoyable, successful granny beaded bag construction that produces professional-quality results.
Creating the Basic Granny Square Bead Motif
The foundation of learning how to do a granny beaded bag lies in mastering the individual granny square motif. This modular approach breaks down seemingly complex beaded bags into manageable components that even beginners can successfully create with practice and patience.https://stellar-pearl.com/collections/beaded-bag
Center Ring Formation (Round 1)
- Initial Bead String: Cut 5 feet of thread, string 4 beads of your background color (Color A), then pass needle through the first bead to form a ring, leaving 6-inch tail for later securing
- Cluster Creation: String 3 beads of your accent color (Color B), skip next bead in your base ring, pass needle through the following bead—this creates your first "cluster" resembling traditional granny square chains
- Completing the Ring: Repeat the 3-bead cluster pattern 3 more times around your base ring, creating 4 distinct cluster groups that form the characteristic granny square appearance
- Round Closure: After completing all 4 clusters, pass needle through the first bead of your first cluster to close the round and position for the next layer
-
Tension Management: Pull thread firmly enough to create flat, even ring without puckering—proper tension in this foundation round determines how well your granny square lies flat
Building Cluster Layers (Round 2)
- Layer Positioning: From your closed Round 1, string 3 Color B beads, then pass needle under the thread loop between two clusters from previous round (this weaving action secures new beads)
- Side Construction: Continue adding 3-bead clusters between each existing cluster group, working your way around all four sides of your developing granny square motif
- Corner Definition: At each of the four corners, string 2 beads instead of 3 to create the characteristic turns that maintain the square shape in your motif
- Step-Up Technique: After completing all sides, pass needle through first 2 beads of your starting cluster in this round this "steps up" positioning you for the next round
- Size Verification: Your granny square should measure approximately 1-1.5 inches at this stage, with clear corner definition and flat appearance
Adding Border Rounds (Round 3+)
- Accent Border: For Round 3, alternate between Color A spacing beads and Color C accent clusters (string 1 Color A bead, then 3 Color C beads, pass under thread loop, repeat)
- Pattern Variation: Create visual interest by changing cluster colors in each round—perhaps Color B for Round 2, Color C for Round 3, returning to Color B for Round 4
- Size Control: Each additional round adds approximately 1/4-inch to your granny square dimensions—plan rounds accordingly for your desired final motif size
- Final Edge: Complete your granny square with a round of single beads in Color A around the entire perimeter, creating clean edges for joining motifs later
- Thread Securing: Weave tail threads through several beads in multiple directions, tie small knots within bead holes, trim excess close to beadwork
Quality Control and Consistency
- Flat Test: Your completed granny square motif should lie completely flat without curling edges or center buckling—any warping indicates tension problems
- Size Consistency: Measure each completed motif to ensure uniform dimensions—variations exceeding 1/8-inch create assembly challenges for your granny beaded bag
- Corner Symmetry: All four corners should look identical with proper bead counts and even spacing throughout your granny square
- Bead Security: Gently tug on various beads around your motif—all should feel secure without excessive movement indicating loose thread tension
- Pattern Clarity: The classic clustered pattern should be clearly visible with distinct separation between cluster groups in your granny square
Color Combinations and Design Planning
After mastering the basic granny square motif technique, exploring color combinations and design planning transforms simple granny beaded bags into personalized accessories that reflect your unique aesthetic. Strategic color selection elevates your project from basic craft to stunning fashion statement.
Classic Vintage Color Schemes
- Traditional Pastels: Combine white or cream background with soft pink, baby blue, mint green, and lavender accent beads for authentic vintage granny beaded bag aesthetics reminiscent of 1960s-70s afghans
- Rainbow Bright: Create cheerful granny beaded bags using white background with rainbow accent progression—red, orange, yellow, green, blue, purple clusters rotating through your motifs
- Monochromatic Elegance: Use varying shades of single color families (light to dark blues, or champagne through chocolate browns) for sophisticated granny beaded bags
- Black and White Contrast: Bold graphic granny beaded bags using only black and white beads create contemporary interpretations of classic granny squares
- Metallic Glamour: Substitute traditional colors with gold, silver, rose gold, and bronze metallic beads for evening-appropriate granny beaded bags
Contemporary Color Approaches
- Ombré Gradients: Gradually transition accent colors from light to dark across your granny beaded bag motifs, creating modern gradient effects while maintaining classic structure
- Color Blocking: Group motifs in solid color sections rather than mixing colors throughout your granny beaded bag—perhaps all pink squares in top half, all blue in bottom half
- Neon Pop: Ultra-bright neon accent beads against neutral backgrounds create trendy granny beaded bags perfect for festival fashion
- Earthy Naturals: Combine terracotta, olive green, rust orange, and mustard yellow for bohemian-style granny beaded bags with organic aesthetic
- Jewel Tones: Deep emerald, sapphire, ruby, and amethyst colored beads create luxurious granny beaded bags with rich, sophisticated appearance
Pattern and Layout Planning
- Uniform Motifs: All granny squares identical in color arrangement creates cohesive, predictable granny beaded bags perfect for beginners
- Random Scrappy: Mix various color combinations across motifs for playful, unexpected granny beaded bags showcasing bead stash diversity
- Planned Gradation: Arrange motifs in intentional color progressions across your granny beaded bag surface—light to dark, warm to cool, etc.
- Border Frame Design: Create granny beaded bags with solid-color border motifs framing multi-colored center motifs
- Diagonal Patterns: Arrange accent colors diagonally across your granny beaded bag rather than in horizontal or vertical bands https://stellar-pearl.com/collections/beaded-bag
Calculating Bead Quantities
- Per-Motif Counting: Track exact bead counts for your first completed granny square, then multiply by total motifs needed for your beaded bag
- Color Distribution: If using 60% background Color A and 40% accent Colors B and C, calculate accordingly when purchasing beads for your granny beaded bag
- Buffer Allowance: Add 15-20% extra beads beyond calculated amounts to accommodate mistakes and design changes in your granny beaded bag
- Sample Motif Testing: Create 2-3 test motifs in different color schemes before committing to purchasing full quantities for your entire granny beaded bag
- Documentation: Photograph and note exact color combinations you love so you can replicate them across all motifs in your granny beaded bag
Chapter 4: Assembling Granny Squares into Bag Panels
After creating individual granny square motifs, assembly techniques transform your collection of small pieces into cohesive panels that form your granny beaded bag. This critical phase determines the structural integrity and professional appearance of your finished accessory.
Motif Connection Methods
Whip Stitch Joining represents the most straightforward technique for connecting granny squares into panels for your beaded bag. Position two completed motifs side-by-side with edges touching, then thread a needle with matching thread. Pass the needle through corresponding edge beads on both motifs, working your way along the entire joining edge. This creates a visible seam that becomes part of your granny beaded bag's design aesthetic, adding textural interest while securely connecting pieces.
Invisible Join Technique produces seamless connections between granny square motifs where joining threads remain hidden within beadwork. As you complete the final round of your second motif, instead of adding new beads along the edge that will connect to the first motif, pass your needle through existing edge beads on the completed motif. This effectively "zips" the two granny squares together during the final round construction, creating nearly invisible joins in your granny beaded bag.
Jump Ring Connection offers a metallic accent approach to joining granny squares for your beaded bag. After completing all motifs, use small jump rings to connect corner beads or specific edge points between adjacent squares. This creates a slightly flexible, chain-mail-like connection that adds visual interest while allowing slight movement between motifs in your granny beaded bag. This method works particularly well for bohemian or contemporary styled bags.
Panel Layout and Structure
Front and Back Panel Formation begins with determining your granny beaded bag dimensions. For a small clutch, arrange 2 rows of 3 granny squares (6 total per panel, 12 for complete bag). Medium shoulder bags might use 3 rows of 4 squares (24 total), while larger totes could incorporate 4 rows of 5 squares (40 total). Lay out your motifs on a flat surface before joining to ensure satisfactory color distribution across your granny beaded bag panels.
Side Gusset Considerations determine whether your granny beaded bag will be flat or have depth. Flat clutch-style bags simply join front and back panels along three edges (bottom and sides), leaving the top open. For dimensional bags with depth, create narrow side panels using 1 row of 3-4 granny squares that connect between front and back panels, adding 2-3 inches of interior capacity to your beaded bag.
Base Reinforcement Options strengthen the bottom of your granny beaded bag where stress concentrates. Consider adding an extra layer of granny squares only to the bottom portion of your panels, creating double-thickness that supports weight better. Alternatively, plan to insert a rigid base (plastic canvas or cardboard) between front and back panels during final assembly of your granny beaded bag.
Edge Finishing Techniques
Perimeter Beading creates clean, finished edges around the entire opening of your granny beaded bag. After joining front and back panels, add a final round of beads completely around the top opening, weaving through edge beads and creating uniform border that conceals any joining irregularities. This perimeter round also provides ideal attachment points for hardware and handles on your beaded bag.
Reinforcement Stitching strengthens joined seams throughout your granny beaded bag. After completing initial joins between motifs, make a second pass along all seams using fresh thread, effectively doubling the strength of connections. This redundant stitching prevents the catastrophic failure that occurs when a single thread breaks, protecting your investment of time and materials in your granny beaded bag.
Decorative Trim Additions transform functional edges into design features on your granny beaded bag. Consider adding beaded fringe along the bottom edge, creating small beaded tassels at corner junction points, or incorporating ribbon or chain threaded through edge beads for mixed-media interest. These embellishments personalize your granny beaded bag while concealing any minor imperfections in motif joining.

Lining, Hardware and Final Assembly
Completing your granny beaded bag requires professional finishing that transforms assembled granny square panels into a functional, durable accessory. These final steps determine whether your project looks handmade or professionally crafted.
Interior Lining Construction
Measuring and Cutting Lining begins by laying your assembled granny beaded bag panels flat and measuring interior dimensions. Cut lining fabric 1/2 inch larger on all sides than your measured dimensions to allow for seam allowances. For bags with side gussets, create corresponding fabric panels that will form a pouch matching your beaded exterior dimensions when assembled into your granny beaded bag.
No-Sew Lining Method provides accessible finishing for crafters without sewing machines. Use fusible hem tape to create finished edges on all lining pieces, then assemble the lining pouch using fabric glue rather than stitching. Once the interior pouch is complete, apply glue sparingly to the wrong side of the lining, then carefully insert it into your granny beaded bag, smoothing against the interior beadwork and pressing firmly for complete adhesion.https://stellar-pearl.com/collections/beaded-bag
Sewn Lining Advantages offer superior durability for granny beaded bags intended for regular use. Machine or hand-stitch lining fabric pieces into a pouch with French seams that enclose raw edges, then slip-stitch the lining into your beaded exterior along the top opening. This creates a completely enclosed, professional interior finish in your granny beaded bag that withstands years of use without delamination issues common with glued linings.
Hardware Installation
Magnetic Clasp Placement requires identifying the center point of your granny beaded bag opening, then installing clasp halves symmetrically. Position the magnetic portions approximately 1 inch below the top edge on interior lining, securing with stitching that passes through both lining and backing beadwork for maximum strength. Test closure action before considering installation complete on your beaded bag.
Handle Attachment Options vary based on your preferred granny beaded bag style. Chain handles attach using jump rings connected through reinforced edge beads at top corners of your bag. Fabric or wooden bead handles require stitching attachment points backed by small leather or ultrasuede patches that distribute stress across wider areas. For removable handles, install D-rings or O-rings securely to your granny beaded bag that accept various handle styles.
Decorative Hardware Additions personalize your granny beaded bag beyond basic functional necessities. Consider adding small metal charms that dangle from corner beads, decorative zipper pulls even if your bag uses magnetic closure, or small metal plaques with your initials attached to the front panel. These details transform basic granny beaded bags into custom accessories reflecting your personal style.
Final Quality Control
Structural Testing verifies that your completed granny beaded bag withstands intended use without failures. Begin by gently filling the bag with light contents (tissue paper or bubble wrap), then gradually increase weight while monitoring all seams and attachment points for stress signs. Successful granny beaded bags maintain structure without distortion under anticipated load.
Aesthetic Refinement addresses any minor imperfections visible in your completed granny beaded bag. Add extra beads to fill small gaps between motifs, reinforce any joins that appear weak, and ensure all thread tails are completely secured and invisible. These final touches elevate your granny beaded bag from acceptable to exceptional.
Maintenance Planning considers the long-term care your granny beaded bag will require. Create a storage plan that protects the bag from dust and crushing—perhaps a fabric dust bag or padded box. Develop cleaning protocols (typically gentle brushing with soft makeup brush) that maintain appearance without damaging beadwork. Well-maintained granny beaded bags remain beautiful for decades, often becoming treasured heirloom pieces passed through generations.
FAQ About How to Do a Granny Beaded Bag
How long does it take to make a granny beaded bag?
Creating a granny beaded bag typically requires 20-40 hours depending on bag size and your skill level. Individual granny square motifs take 1-2 hours each for beginners, with speed increasing significantly as you gain experience. A small clutch using 8-10 motifs might complete in 15-20 hours, while larger bags with 30+ granny squares could require 40+ hours spread across several weeks.
Most crafters work on granny beaded bags in manageable sessions, completing 1-2 motifs per sitting rather than attempting marathon construction. This modular approach makes granny beaded bags perfect for portable projects—carry your current motif and supplies anywhere for productive crafting during commutes, waiting rooms, or relaxing evenings.
Can beginners successfully make a granny beaded bag?
Absolutely! Granny beaded bags represent excellent beginner projects because they break down complex construction into small, manageable granny square motifs. The repetitive nature helps you master basic beading techniques through practice, with each motif building confidence and speed. Start with a simple small bag using just 6-8 motifs in 2-3 colors to minimize complexity.
The key to beginner success with granny beaded bags lies in choosing appropriate patterns and not rushing the process. Select simple granny square designs with clear instructions, use larger beads (size 6/0 or 8/0) that are easier to handle, and focus on consistent tension rather than speed. Most beginners complete impressive granny beaded bags as early projects.
What's the best size beads for granny beaded bags?
Size 8/0 seed beads work best for most granny beaded bags, offering ideal balance between detailed pattern visibility and reasonable construction speed. These medium-sized beads (approximately 3mm) create clear granny square definition while completing motifs in manageable timeframes. A single motif using 8/0 beads typically requires 200-250 beads and completes in 1-1.5 hours.
Size 6/0 beads suit granny beaded bags when you want bolder, faster results with larger motifs. These work particularly well for casual bohemian-style bags. Conversely, size 11/0 seed beads create more delicate, detailed granny beaded bags but require significantly more time and patience, typically suiting experienced beaders rather than beginners.
How do I keep granny squares the same size?
Maintaining consistent granny square size throughout your beaded bag requires careful attention to bead counts and tension. Count beads precisely for each round of your first motif, then document these counts as your pattern template. For subsequent motifs, follow these exact counts while maintaining identical thread tension throughout all granny squares.
Create a physical template by tracing your first completed motif onto cardboard, then periodically check subsequent granny squares against this template during construction. If motifs vary more than 1/8 inch, adjust your tension—tighter for motifs coming out too large, looser for those too small. Consistent practice develops muscle memory that produces uniform granny squares automatically.
Can I make a granny beaded bag without joining squares?
While traditional granny beaded bags assemble individual granny square motifs, you can create similar aesthetic using continuous construction without distinct separate squares. This approach works the granny square pattern continuously across the entire bag panel in one piece, creating the visual appearance of joined motifs without actual seams. However, this requires advanced planning and doesn't offer the beginner-friendly modularity that makes granny beaded bags accessible.
For most crafters, the modular approach of creating separate granny squares then joining them offers significant advantages—you can work on portable individual motifs, easily correct mistakes in single squares without affecting your entire project, and customize color placement as your design evolves during your granny beaded bag creation.
How do I care for my finished granny beaded bag?
Granny beaded bags require gentle care to maintain their beauty through years of use. Store your bag in a dust bag or soft cloth wrapping when not using it to prevent dust accumulation and protect beads from scratching. Avoid exposing your granny beaded bag to excessive moisture, which can damage both beads and thread, and keep it away from direct sunlight that might fade certain bead colors over time.
Clean your granny beaded bag regularly using a soft makeup brush to gently remove surface dust from beadwork. For deeper cleaning, use barely-damp microfiber cloths on individual motifs, immediately patting dry. Avoid submerging your granny beaded bag in water or using chemical cleaners. Periodically inspect seams and thread for wear, reinforcing any areas showing stress before minor issues become major failures.
Conclusion
Mastering how to do a granny beaded bag empowers you to create stunning vintage-inspired accessories that combine nostalgic charm with contemporary beading artistry. Throughout this comprehensive guide, you've discovered everything from selecting appropriate materials and creating basic granny square motifs to planning color combinations, assembling panels, and executing professional finishing techniques that transform beaded squares into functional, beautiful beaded bags.
The modular nature of granny beaded bags makes them uniquely accessible—you're never facing an overwhelming complete bag construction, but rather creating one manageable granny square at a time that eventually combines into your finished accessory. This approach suits busy crafters who work in small sessions, perfectionists who want to ensure each motif meets their standards before proceeding, and beginners building confidence through repetitive practice of fundamental beading techniques.
Remember that your first granny beaded bag represents a learning journey as much as a finished product. Each granny square you complete builds skills, develops consistent tension, and refines your color sensibility. Whether your initial bag shows minor imperfections or achieves flawless results, you've gained valuable knowledge applicable to countless future beading projects. The satisfaction of carrying a granny beaded bag you've created yourself makes every hour invested worthwhile.
Whether you're drawn to classic pastel vintage aesthetics, bold contemporary color blocking, or elegant monochromatic sophistication, the granny beaded bag construction method adapts beautifully to any style preference. Embrace this versatile technique to create accessories that express your unique style and affirm your individuality through beautiful handcrafted design that honors traditional crafts while creating modern fashion statements!


No comments


0 comments